How to See Scheduled Posts on Instagram Quickly
·10 min read

You've checked Instagram twice, refreshed the profile, and still can't find the post you scheduled for tomorrow morning. The post hasn't necessarily disappeared. In many cases, you're looking in a different tool from the one that created it.
That distinction matters when you manage personal content, a business account, or several client calendars. Scheduled Instagram content may live in the Instagram app, Meta Business Suite, or a third-party scheduler, and each location has its own queue. The fastest way to schedule Instagram posts is also the fastest way to find them later: remember where you created the post.
Instagram scheduling is part of a much larger publishing system. Industry summaries place Instagram at roughly 2.0 billion to 3.0 billion monthly active users worldwide in 2026, while Meta reported 3.56 billion family daily active people across its apps in March 2026, up 4% year over year, as summarized by Instagram platform statistics. A missed publishing slot can therefore affect a substantial audience, especially when the same campaign supports several networks.

The practical rule is simple: check the creation tool first, confirm the connected account, then inspect the scheduled queue. If you've used Meta Business Suite, start with Planner. If you scheduled in Instagram, look for Scheduled Content in the professional account menu. If you used another platform, open that platform's calendar instead.
How to View Scheduled Posts Inside the Instagram App
The Instagram app can be enough when you're checking one professional account from your phone. The menu isn't always in the same place, though, and the option may not appear for personal accounts or in every app version.
Find the scheduled content menu
Open Instagram and go to the correct profile. Then:
- Tap your profile picture in the bottom-right corner.
- Open the menu in the top-right corner.
- Look below Your insights and tools for Scheduled content.
- Tap the scheduled post or Reel you want to inspect.
- Open its options menu to edit, reschedule, delete, or share it immediately.
Instagram's own help guidance places scheduled content inside professional workflows, and recent guidance notes that the option can appear under different menus depending on account type and interface version. If you can't find Scheduled content, confirm that you're using the intended professional profile rather than assuming the post has vanished.
You can also reach scheduled content while creating a new post or Reel. Tap Create, choose Post or Reel, and look for Scheduled in the creation flow. This can be useful when you're already preparing another item, but it's less convenient for auditing a busy queue.

Know the app's limits
The app works well for a quick caption check or a last-minute change. It's less practical when you're reviewing a campaign across several dates, switching between client profiles, or trying to distinguish Instagram posts from Facebook content.
Posts created through Meta Business Suite may not consistently surface in Instagram's own scheduled-content view. That's why mobile checking shouldn't be your only audit method when the original scheduling action happened on desktop.
Practical rule: If you scheduled the post in Instagram, check Instagram first. If you created it in Meta Business Suite, go to Planner before troubleshooting anything else.
How to Find Scheduled Instagram Posts in Meta Business Suite Planner
For desktop audits, Meta Business Suite Planner is usually the clearest place to inspect a queue created through Meta's publishing tools. It gives you a calendar-style view of scheduled and published Facebook and Instagram content, with controls for editing, moving, or canceling posts. Meta Business Suite scheduling guidance also reflects this Planner-based workflow.
Open the correct queue
Start at Meta Business Suite and verify the business profile before opening the calendar. A wrong profile is one of the easiest ways to make a valid post look missing.
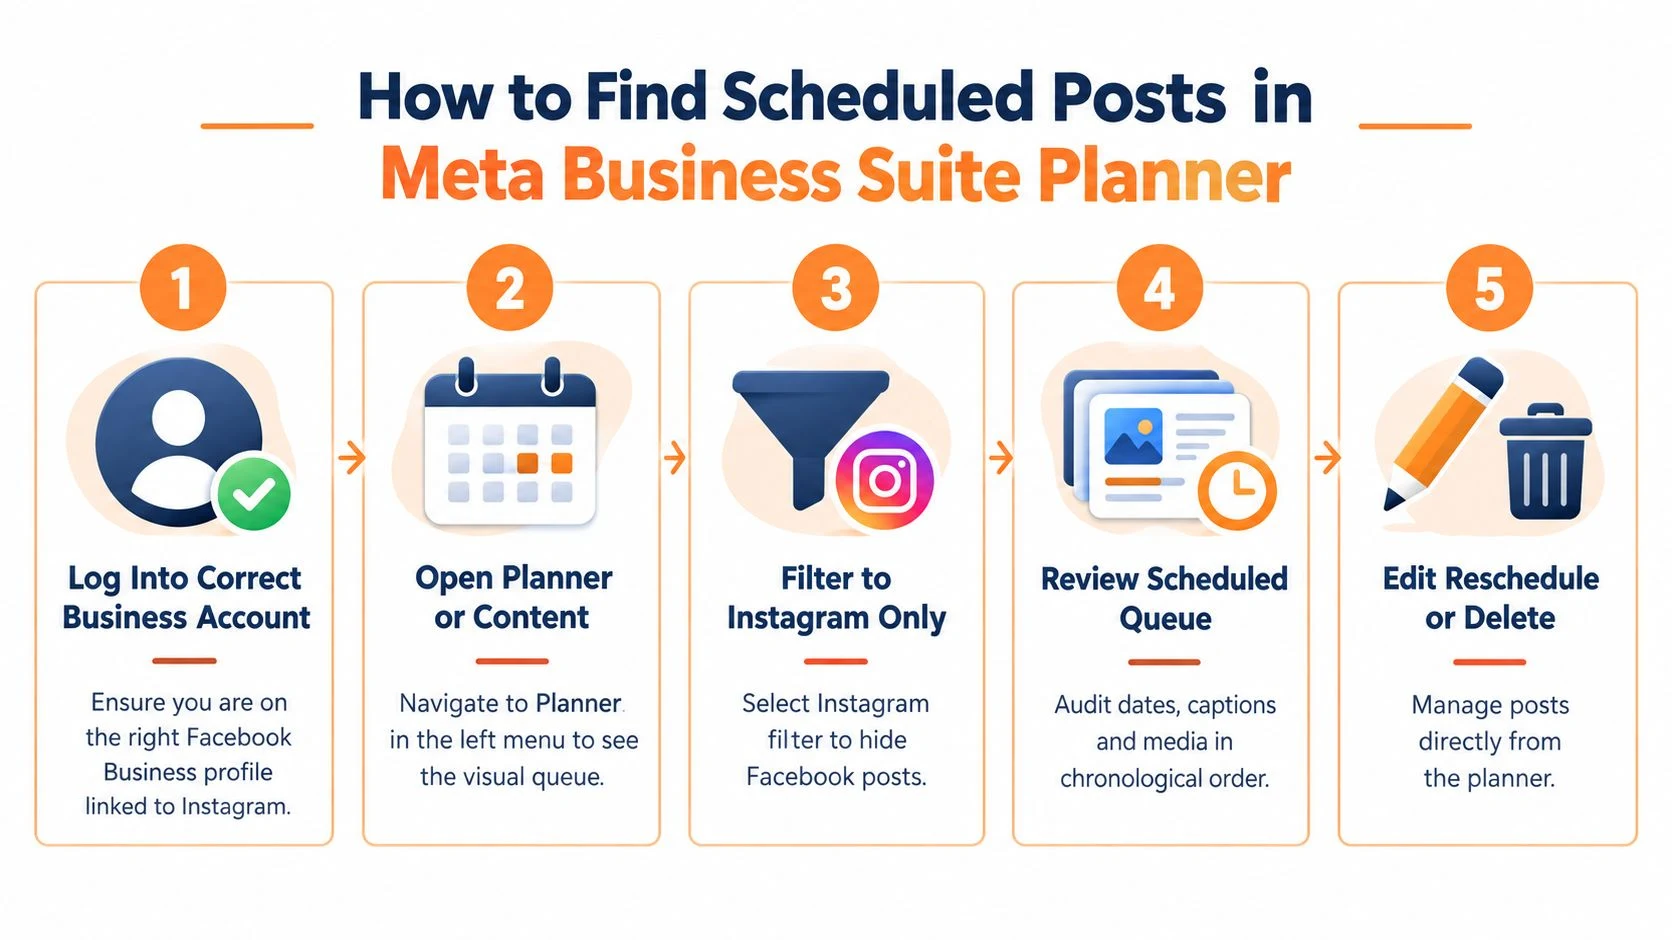
Use this sequence:
- Log into the Facebook account with access to the relevant business.
- Confirm the selected business profile and connected Instagram account.
- Open Planner from the left-side navigation.
- If Planner doesn't show the item, open Content.
- Filter the platform to Instagram.
- Filter the status to Scheduled.
- Switch between Week and Month views to locate the post.
The Instagram and Scheduled filters matter. Without them, Facebook content can crowd the calendar, while an incorrect status filter can hide the queued post entirely. The Meta Business Suite scheduling workflow follows the same basic mechanic: create the post, select the connected Instagram account, and choose Schedule from the publish dropdown rather than Publish.
Audit each scheduled item
Click a calendar card to open its details. Review the caption, media, destination account, date, and publish time. Pay close attention to the time zone shown in the scheduling interface, particularly when a team member works from another region.
From the item details, you can generally edit the content, reschedule it, or delete it before publication. This makes Planner more useful than a quick mobile check when you're reviewing a client calendar or looking for gaps in a campaign.
Meta Business Suite can also suggest up to three Active Times based on follower activity. Treat those suggestions as planning input, not an automatic guarantee of reach. The scheduling control still depends on the selected date, time, account permissions, and media meeting Instagram's requirements.
For teams comparing publishing methods, native scheduling on social media platforms helps frame the trade-off. Native tools keep you close to Meta's own account structure, while a separate scheduler may give you a broader operational view.
How to See and Manage Scheduled Posts in Donivo and Other Schedulers
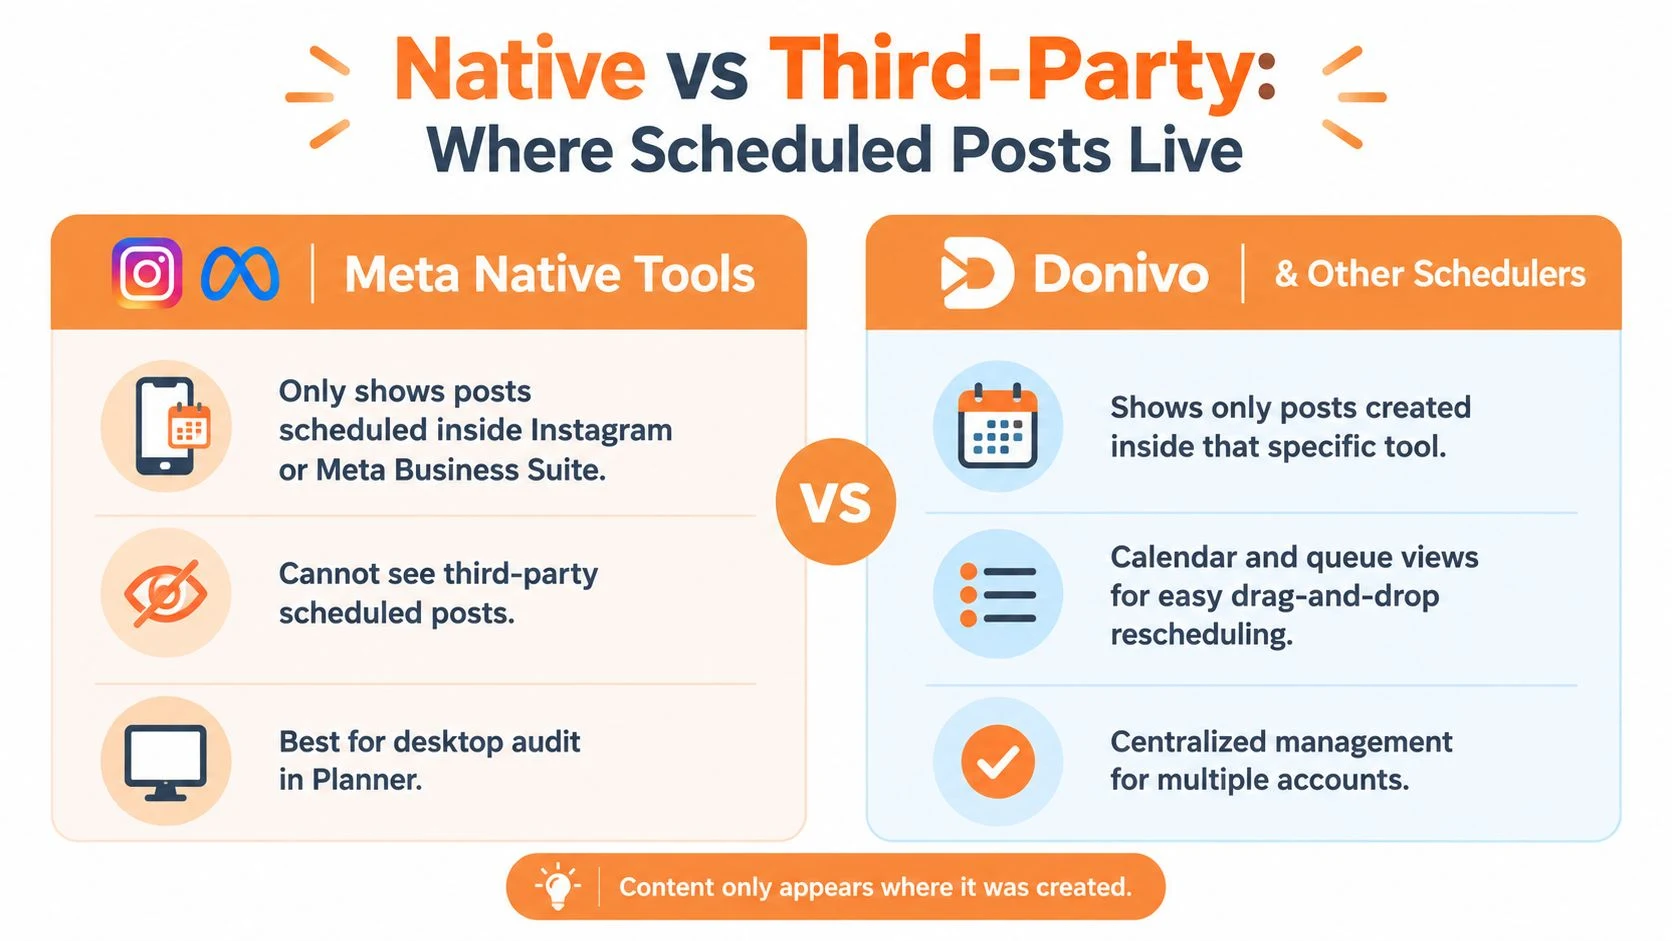
A third-party scheduler has its own queue. It won't automatically display posts created in Instagram or Meta Business Suite, just as Meta's calendar won't normally display content created in an unrelated scheduling platform.
That separation is the source of many “missing post” reports. A social media manager may create one item in Instagram, another in Business Suite, and a third in a client's scheduling tool, then expect one calendar to show everything. Each platform can only reliably manage the content created or imported into its own workflow.
Where to look based on where you scheduled
| Created In | Where to View | What You Can Do |
|---|---|---|
| Instagram app | Professional profile, then Scheduled Content | Preview, edit, reschedule, delete, or share now |
| Meta Business Suite | Planner or Content, filtered to Instagram and Scheduled | Audit the queue, edit, move, reschedule, or delete |
| Donivo or another scheduler | That platform's calendar or queue | Review and manage posts created inside that tool |
A multi-network scheduler becomes more useful when your Instagram calendar is part of a wider publishing operation. Donivo can centralize content planning for Instagram alongside Facebook, X, LinkedIn, TikTok, YouTube, Threads, and Bluesky within its own connected workflow. Its queue and calendar views are designed to let teams preview content, update captions or media, change publishing times, and organize workspaces without opening each network separately.
For teams evaluating connected analytics and advertising workflows, an Instagram integration for Cometly may also be relevant, particularly when the question extends beyond scheduling into campaign measurement. That type of integration serves a different purpose from a publishing queue, so decide whether you're trying to find pending posts, track performance, or do both.
The operational trade-off is straightforward. Meta Business Suite is the natural audit point for Meta-created content. A third-party scheduler can reduce context switching for multi-network teams, but only if everyone follows one agreed creation workflow. You can learn more about Donivo's social media scheduling workspace when comparing those approaches.
Why Scheduled Posts Do Not Appear and How to Fix It
When a scheduled post seems missing, start with the account and creation tool before blaming the calendar. Most visibility problems come from a mismatch between the profile, permissions, filters, or content format.
Check these failure points in order
- Wrong business profile: Confirm that Meta Business Suite is open to the business connected to the intended Instagram account. A valid post can appear absent when you're viewing another client or workspace.
- Personal account: Scheduled publishing generally requires a professional Instagram account connected through Meta's business publishing workflow. A personal account may not expose the same scheduling controls or menus.
- Expired permissions or tokens: Access permissions can expire or become invalid after a password, role, or account-connection change. Recheck the account connection and user permissions before recreating the post.
- Media specifications: Unsupported dimensions, file types, durations, or carousel and Reel rules can stop a post from publishing or prevent it from entering the queue correctly. If you're producing cinematic social media content, verify the final exported file against Instagram's current requirements before scheduling.
- Scheduling limits: Industry troubleshooting guidance cites guardrails of up to 25 posts per day and a maximum 75-day scheduling window for native Instagram scheduling, as documented in Instagram scheduled-post troubleshooting guidance. If your plan falls outside those limits, the schedule may fail even though the interface looks normal.
API rate limits and unsupported Reel or carousel formats can create similar symptoms. Check the account type, permissions, date window, and media format in that order. Then return to Planner or Content and confirm that Instagram and Scheduled are selected, since a hidden filter can make a queued item look deleted.
If the content concerns Stories, don't assume the same workflow applies to feed posts and Reels. The guide to scheduling Instagram Stories can help you separate a format-specific limitation from a general scheduling problem.
Quick Verification Routine to Keep Your Instagram Queue Accurate
A short review after every scheduling session prevents most avoidable surprises. First, identify the tool that created the post. Then confirm the correct account, open the relevant calendar or queue, and filter to Instagram plus Scheduled where those filters exist.
Open the post itself rather than trusting the calendar card. Check the caption, media preview, destination profile, date, time, and time zone. If you've changed the asset, review the replacement file again because an edit can introduce a format problem that wasn't present in the original.
Use the Instagram app for a fast single-account check, Meta Business Suite Planner for a desktop campaign audit, and your third-party scheduler for content created there. A preview tool such as Donivo's social media post preview can expose cropping or layout issues before publication, while an Instagram engagement rate calculation guide can help you review results after the post goes live.
Queue habit: Check the scheduled item once after creation, once after any edit, and once after publication.
If you want one place to manage Instagram scheduling alongside other connected networks, Donivo provides calendar and queue views for content created within its platform. Connect your accounts, confirm the Instagram queue, and use the preview and notification workflow to catch changes before they become missed publishing slots.