How to Schedule TikTok Posts: Native and Third-Party Methods
·Updated ·15 min read
You've finished editing the video, written the caption, and picked the cover frame. Then the clock becomes the problem. Your audience may be active in another time zone, a client may need the post to publish while nobody is online, and a failed upload can leave a gap in the calendar. Learning how to schedule TikTok posts is less about finding a calendar icon and more about building a publishing process that survives account, timezone, and platform issues.
TikTok first introduced its native Video Scheduler in 2021, allowing creators and business accounts to plan posts instead of publishing manually in real time. The original scheduling window ran from 15 minutes to 10 days ahead, which established the desktop workflow many teams still use. Read TikTok's Video Scheduler announcement for the original feature context, then confirm the controls shown in your current account.
In practice, choose TikTok Studio when one person owns a TikTok-only queue. Choose a third-party scheduler when the same campaign needs tailored versions for several networks, shared calendars, or a recovery process. TikTok's scheduling help can change as the product changes, so use the current interface as the final authority. For the broader decision, see the native scheduling guide.
Choosing between TikTok native scheduling and third-party tools
The first decision is whether you need to schedule one TikTok account or operate a publishing system across several accounts and networks. TikTok Studio keeps the upload close to the platform where the video will appear. A third-party scheduler can coordinate a larger calendar, but it adds an account connection, another service to maintain, and dependency on its TikTok integration.
| Feature | TikTok native scheduler | Third-party scheduler |
|---|---|---|
| Scheduling horizon | Commonly documented from 15 minutes to 10 days ahead in 30-minute increments; account interfaces can change | Often supports a longer planning horizon, depending on the provider |
| Account volume | Best suited to checking one account at a time | Designed for multiple accounts and workspaces |
| Team collaboration | Limited approval and review support | May include drafts, approvals, roles, and shared calendars |
| Cross-platform publishing | TikTok only | Can coordinate TikTok with other supported networks |
| Analytics depth | TikTok account-level analytics | May combine channel calendars, reports, and publishing status |
| Failure recovery | Direct checking and manual intervention | May provide alerts, retries, logs, and reauthentication workflows |
Practical rule: use TikTok Studio when one person owns the channel. Use a third-party scheduler when several people, accounts, markets, or platforms share the same calendar.
Scheduling posts directly in TikTok Studio
TikTok Studio is the native route when you want TikTok to handle the final publication. The labels can differ between app releases and account surfaces, but the sequence is consistent: prepare the final asset, complete the post settings, choose an available time, and verify the saved item.
TikTok's current creator-tools support page lists scheduling as a TikTok Studio feature and says the tools are available on mobile and the web for Personal and Business Accounts. Its separate TikTok Studio guide explains that Studio can create, upload, edit, and manage posts.
Follow the native upload path on desktop
- Upload the video. Select the finished vertical asset. TikTok's upload workflow supports common video files such as MP4 and WebM, with videos up to 60 minutes in the workflow described here.
- Write the caption. Add the description and relevant hashtags. Keep the first line useful because viewers may see it before expanding the caption.
- Choose a cover frame. Scrub through the video and select a frame that makes sense on your profile grid. A clear visual cue is more useful than a random frame from the middle.
- Review visibility and interactions. Check who can view the post and whether comments, Duets, or Stitches should be available.
- Turn on Schedule. Scroll to the publishing controls and enable the scheduling option.
- Select the date and time. The native workflow described here supports a publish time from 15 minutes to 10 days ahead, in 30-minute increments. Confirm the timezone before saving the slot.
- Confirm the post. Review the scheduled item in TikTok Studio before leaving the page.
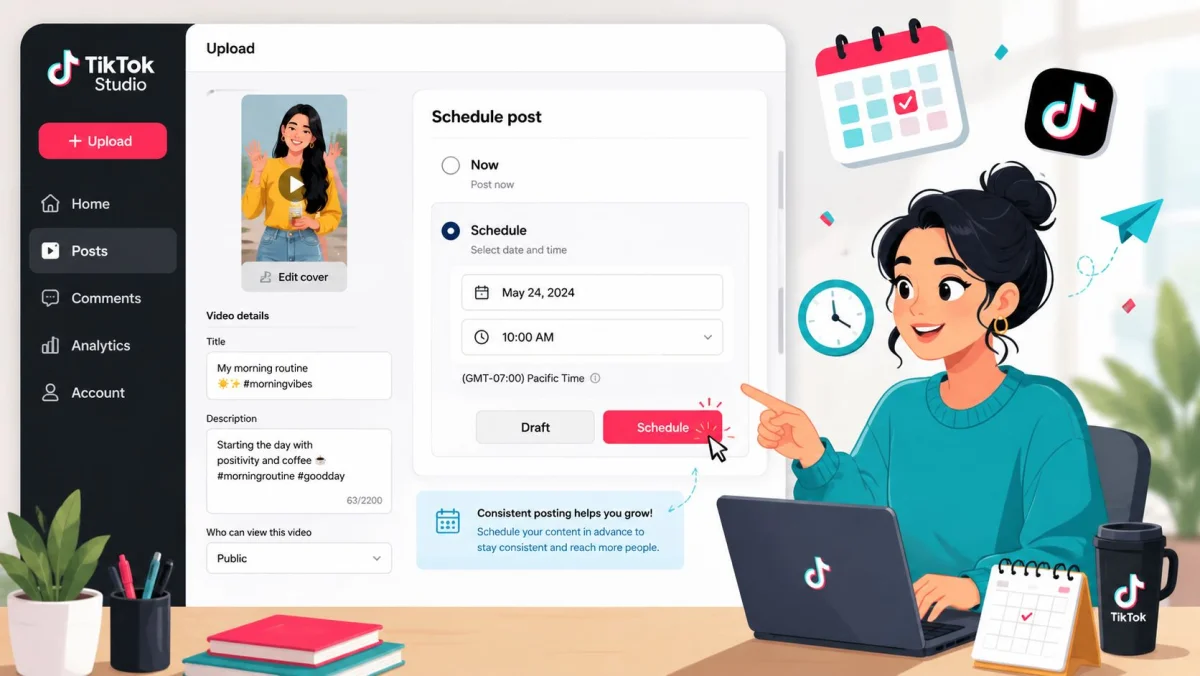
The time window and available increments can change as TikTok updates its tools. Treat the dates exposed by your account as the final authority before promising a long campaign horizon.
Follow the native upload path on a phone
TikTok currently says creator tools are available in the mobile app, on the web, and in the TikTok Studio app. If Schedule is missing in the main TikTok app, open the TikTok Studio area, update the app, or try the web workflow.
- Open TikTok Studio on your phone. If you start in the main TikTok app, enter the creator-tools or TikTok Studio area.
- Start a new post and choose the final video from your device.
- Complete the caption, cover, audience, privacy, interaction, disclosure, and available sound settings.
- Open the timing controls, choose Schedule, and select an available date and time.
- Confirm the schedule, then open the Posts or content management area and verify the saved item.
Do not switch account type solely because an older tutorial says scheduling requires it. TikTok's current support guidance and the controls available to your account are more useful than a fixed eligibility rule copied from an earlier interface.
Edit carefully before scheduling
Native scheduling is less forgiving after confirmation. Open the Scheduled tab or post-management area to review upcoming items. If you need to change the caption, video, cover, or timing, look for Edit first. If the control is unavailable, delete the scheduled post and upload it again with the correction. Verify that the replacement occupies the intended slot before leaving the old item.
Native scheduling does not replace recurring time slots, bulk uploads, team approval gates, or cross-posting. It works well when one person batches a few videos and checks each one personally, but a shared queue needs a different operating model.
For larger batches, this batch posting TikTok content guide can help organize the asset-preparation work before you upload.
Scheduling TikTok videos with a multi-platform scheduler
A third-party scheduler becomes useful when TikTok is one destination inside a larger publishing plan. Connect the account, prepare the asset once, adapt the copy where needed, and assign the post to a shared calendar. The workflow saves repeated copying, but the connected account and platform permissions still need active review. The practical social media scheduling guide covers the broader planning workflow.
Connect the account securely
Start by adding a TikTok Business or Creator account through the scheduler's Connect account or Add channel flow. TikTok sends you through OAuth, where you approve the permissions required by the service. Passwords should not be entered into the scheduler itself. TikTok's Content Posting API guide describes the approved publishing scope and authorization from the target TikTok user.
After authorization, confirm that the correct TikTok profile is selected. Check the avatar, username, and workspace before uploading campaign content. Connecting an agency owner's profile and assuming the client account is active is an easy way to send the right video to the wrong queue.
Build the post in the media library
Upload the vertical video into the scheduler's media library or composer. Check the preview for a 9:16 presentation, make sure the cover frame is readable, and confirm whether the platform will publish automatically or send a notification for a final manual step.
Write the TikTok caption separately from captions for Instagram Reels or YouTube Shorts when the audience context differs. Add mentions carefully, include a link-in-bio reference only when it makes sense, and review platform-specific disclosure settings before approval. Use the social media image and video size guides when the same source asset needs versions for more than one network. For a broader workflow, see this multi-platform video automation guide.
Use queues and recurring slots
A calendar view lets you assign a precise date and time. A queue view is useful for evergreen content because it fills the next available slot automatically. Some schedulers also support recurring slots, such as 9 AM, 1 PM, and 7 PM daily. Treat those times as workflow placeholders rather than universal performance rules.
Set the scheduler's timezone deliberately. If the account serves several markets, create separate queues or posting rules instead of relying on one global clock. OAuth failures need their own checklist: tokens can expire, permissions can be revoked after a password change, and an administrator can disconnect the account without telling the person who owns the queue. Reauthorize the connection, then inspect the queue before recreating anything. Compare the available social scheduling workflows against your account, approval, and recovery needs before choosing a provider.
Schedule TikTok with Donivo
Donivo uses an OAuth-based TikTok connection, so it does not receive your TikTok password. Select TikTok alongside any other connected accounts that need a version, then tailor the post for each destination instead of copying one caption everywhere.
- Connect the TikTok account and approve the requested access on TikTok's authorization screen.
- Create the campaign post and select TikTok alongside the other connected accounts that need a version.
- Prepare the TikTok version as one video. Donivo currently accepts a video from 3 seconds to 10 minutes and up to 250 MB.
- Choose the publication date and time, save the scheduled post, and confirm it appears in the intended queue.
- After delivery, inspect the live post. Donivo checks TikTok processing status, retries supported temporary failures, and alerts you when a post needs attention.
TikTok's current Direct Post reference caps API video captions at 2,200 UTF-16 runes and requires the publisher to use the privacy options returned for that creator. Keep the third-party version within the limit shown by the connected publisher, even if a native-app writing guide lists a different ceiling. You can inspect the draft with the free character counter.
Run this TikTok preflight before scheduling
Most scheduling failures are easier to prevent than repair. Use this checklist before the post enters the queue, regardless of which scheduling path you choose.
Check 1
Video
Open the final export, watch it from start to finish, and confirm the chosen publishing path accepts its duration and file size.
Check 2
Caption
Proofread the first line, mentions, hashtags, disclosure language, and call to action. Keep the third-party version within the limit shown by that publisher.
Check 3
Sound and rights
Confirm whether the audio is already in the video or must be selected inside TikTok. Do not assume a scheduler can add a library sound later.
Check 4
Visibility
Review the eligible privacy choice, comments, Duet, Stitch, and any commercial-content disclosure before scheduling.
Check 5
Timing
Check the date, local time, timezone, and whether the account offers the full scheduling horizon you need.
Check 6
Final verification
Open the saved queue item, then inspect the live post after delivery. A closed composer is not proof that the post was scheduled.
For the visual export, use the social media image and video size guides as a preparation aid. For a deeper check on duration and encoding, review the social media video length limits. If you are publishing a photo post or carousel instead of a video, use the TikTok photo and carousel dimensions guide before following the upload validation shown by TikTok or your scheduler. For timing, the TikTok best-time guide gives a starting point, not a performance guarantee. Your own audience history should decide the final slot.
Handle sound, privacy, and processing deliberately
Sound is a workflow choice, not a detail to fix after the queue is built. If the required audio is already part of your exported video, verify the file before uploading. If you need a sound from TikTok's library, confirm that the chosen scheduling path exposes that selection. Donivo does not add a TikTok library sound to the video after you schedule it.
TikTok's official content-sharing guidelines require third-party publishers to show the creator's eligible privacy choices, get a manual selection, display a content preview, collect the required music-usage confirmation, and surface processing status. Those requirements explain why a connected publishing workflow can have more preflight controls than a simple upload box.
Processing is not always instant. TikTok tells API clients to notify users that a post may take a few minutes to appear and to poll the status endpoint or use status webhooks. Current community threads also report occasional delayed review and desktop publishing problems, but those anecdotes do not prove a universal platform fault or a reach penalty.
Picking the right posting times across time zones
Generic best-time lists are a starting hypothesis, not a permanent schedule. Open TikTok Analytics and compare follower activity with audience geography. The useful question is: What time is it where the viewers I need are awake and scrolling? Treat Buffer's TikTok timing analysis as a starting point, not a permanent rule. Use the TikTok best-time guide for planning options, then let account-level results decide the final slots.
Start with local audience time
For a campaign serving one market, schedule around that audience's local timezone. Several markets require separate publishing slots or a verified overlap. An evening post for North American viewers may arrive during the night in Europe, while a European lunchtime release may reach North American viewers at an inconvenient hour.
Check which timezone the scheduler uses. It may display the account timezone, workspace timezone, or a setting selected during setup. If those values differ, the wall-clock time can look correct while TikTok delivers the video hours earlier or later than intended. Keep launches, live events, and embargoes in one named reference timezone. For a technical explanation, read this timezone-aware TikTok scheduling guide.
Turn timing into a test
Test for two to four weeks across two to three candidate windows per market. Record local publish time, market, content type, view-through rate, watch time, and engagement rate. Keep the creative style and caption approach stable while testing timing; changing every variable together makes the result difficult to interpret.
A data-driven TikTok scheduling tool can help organize candidate slots, but account-level results should decide the final windows.
Scheduling discipline: save the intended local time, an ISO-8601 timestamp, the IANA timezone identifier, and the converted publish instant. Compare all four before an item enters the queue, especially around daylight-saving transitions.
Monitoring scheduled posts and recovering from failures
A scheduled post is not finished when it enters the queue. It is finished when TikTok shows that it published successfully and someone has confirmed the live post. Authentication, file validation, permissions, and platform connections can fail independently of the calendar.
Watch the queue, not just the calendar
Configure dashboard or email alerts wherever the scheduler supports them. Check for three kinds of status:
- Authentication errors: reconnect the TikTok account through OAuth, confirm the correct profile, and verify that the queued post still points to it.
- File or format errors: recheck the vertical asset, encoding, duration, and cover frame. Replace the file if the scheduler rejects it instead of repeatedly submitting the same asset.
- Caption or publishing errors: review the caption, mentions, disclosure settings, and platform restrictions before rescheduling.
A post stuck in pending is different from a clear failure. It may not trigger an alert, so include pending items in a weekly queue audit. Look for anything that has passed its expected publish time without a live URL or published status.
Create a retry protocol
For time-sensitive content, manually correct and reschedule as soon as the error appears. Evergreen content can return to the next available queue slot after the underlying issue is fixed. If the same account fails repeatedly, stop automatic retries and escalate to the account owner or platform administrator.
Keep a small incident record with the account, scheduled time, error message, asset name, action taken, and final result. That log turns repeated failures into recognizable patterns instead of recurring surprises. Donivo retries supported temporary failures and alerts you when a post still needs attention. Read the social media automation risk guide before handing unattended publishing to any tool.
Troubleshoot TikTok scheduling by symptom
Symptom: The Schedule control is missing
- Check
- Confirm you are in TikTok Studio or the web creator workflow, update the app, and check whether the feature is available for this account and region.
- Next action
- Try the other official Studio surface. If the control is still absent, publish manually later or use an approved scheduler.
Symptom: The video is rejected before scheduling
- Check
- Review file type, size, duration, caption length, account posting eligibility, privacy options, and current daily posting limits.
- Next action
- Correct the specific validation problem before retrying. Repeatedly resaving the same invalid file will not change the result.
Symptom: The scheduled post has the wrong sound or no sound
- Check
- Determine whether the audio was baked into the video or depended on a TikTok library selection that the scheduling path could not preserve.
- Next action
- Recreate the post in the path that supports the required sound choice. Confirm music rights and the final preview before scheduling again.
Symptom: The post is still processing
- Check
- Look for a TikTok processing state, scheduler alert, connection error, or policy review notice before creating another copy.
- Next action
- Wait for the current status to resolve or follow the stated recovery action. Avoid publishing a duplicate while the first item is still pending.
Symptom: The post is queued for the wrong time
- Check
- Compare the saved date, time, timezone, device timezone, and daylight-saving offset with the intended campaign slot.
- Next action
- Edit the scheduled time if the control is available. Otherwise delete the item, recreate it in the correct slot, and verify the replacement.
The shortest reliable TikTok scheduling workflow
Use TikTok Studio when you only need to schedule TikTok. Use an approved scheduler when TikTok is one destination in a wider campaign. In both cases, finish the video first, decide the sound path, confirm privacy and disclosures, save the local time and timezone, verify the saved queue item, and inspect the live post after publication.
That final verification is the part most guides skip. For a repeatable cross-network process, use the social media scheduling workflow. Scheduling is complete only when the correct post is saved for the correct account and time, then appears live with the intended video, caption, sound, and visibility.